In this post you will learn how to handle errors from within the same page.The JSP page can use try and catch blocks to capture the exception so that it can take appropriate action that is based on the exception type.Before going through exception handling in JSP, let’s understand what is exception and how it is different from errors.
Exception:
These are nothing but the abnormal conditions which interrupts the normal flow of execution. Mostly they occur because of the wrong data entered by user. It is must to handle exceptions in order to give meaningful message to the user so that user would be able to understand the issue and take appropriate action.
Error:
It can be a issue with the code or a system related issue. We should not handle errors as they are meant to be fixed.
Fortunately, JSP has an elegant solution for error handling built in. Many developers never
take advantage of this feature and continue to code each exception handler individually. With
JSP, you can create a single page that will handle every uncaught exception in your system. If
your JSP code throws an exception not handled within a try-catch block, it'll forward the
exception, and control, to a page you specify using a JSP page directive.
There are 2 ways to perform exception handling in jsp:
1. Using isErrorPage and errorPage attribute of page directive.using iserror
2. using standard try..catch block
create an error page:
an error page should take an exception, report it to a system
administrator, and display a meaningful message to the user. The first thing you need to do,
however, is declare that the page to be used is an error page. You do this using the isErrorPage
page directive as follows:
<%@ page isErrorPage="true" %>
If any exception occurs in the main JSP page the control will be transferred to the page mentioned in errorPage attribute.
The handler page should have isErrorPage set to true in order to use exception implicit object. That’s the reason we have set the isErrorPage true for showerror.jsp.
index.jsp:
<%@ page errorPage="showerror.jsp" %>
<html>
<head>
<title>exception handling in jsp</title>
</head>
<body>
<%
//Declared and initialized two integers
int x = 45;
int y = 0;
//It should throw Arithmetic Exception
int div = x/y;
%>
</body>
</html>
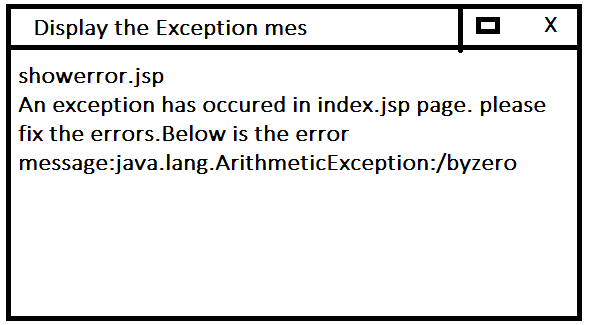
showerror.jsp:
<%@ page isErrorPage="true" %>
<html>
<head>
<title>Display the Exception Message here</title>
</head>
<body>
<h2>showerror.jsp</h2>
<i>An exception has occurred in the index.jsp Page.
Please fix the errors. Below is the error message:</i>
<b><%= exception %></b>
</body>
</html>
Output:

2. Using try..catch block just like we used in core java
<html>
<head>
<title>using try..catch </title>
</head>
<body>
<%
try{
int i = 111;
i = i / 0;
out.println("The answer is " + i);
}
catch (Exception e){
out.println("An exception occurred: " + e.getMessage());
}
%>
</body>
</html>
Output:
An exception occurred: java.lang.ArithmeticException:/byzero
Exception:
These are nothing but the abnormal conditions which interrupts the normal flow of execution. Mostly they occur because of the wrong data entered by user. It is must to handle exceptions in order to give meaningful message to the user so that user would be able to understand the issue and take appropriate action.
Error:
It can be a issue with the code or a system related issue. We should not handle errors as they are meant to be fixed.
Fortunately, JSP has an elegant solution for error handling built in. Many developers never
take advantage of this feature and continue to code each exception handler individually. With
JSP, you can create a single page that will handle every uncaught exception in your system. If
your JSP code throws an exception not handled within a try-catch block, it'll forward the
exception, and control, to a page you specify using a JSP page directive.
There are 2 ways to perform exception handling in jsp:
1. Using isErrorPage and errorPage attribute of page directive.using iserror
2. using standard try..catch block
create an error page:
an error page should take an exception, report it to a system
administrator, and display a meaningful message to the user. The first thing you need to do,
however, is declare that the page to be used is an error page. You do this using the isErrorPage
page directive as follows:
<%@ page isErrorPage="true" %>
If any exception occurs in the main JSP page the control will be transferred to the page mentioned in errorPage attribute.
The handler page should have isErrorPage set to true in order to use exception implicit object. That’s the reason we have set the isErrorPage true for showerror.jsp.
index.jsp:
<%@ page errorPage="showerror.jsp" %>
<html>
<head>
<title>exception handling in jsp</title>
</head>
<body>
<%
//Declared and initialized two integers
int x = 45;
int y = 0;
//It should throw Arithmetic Exception
int div = x/y;
%>
</body>
</html>
showerror.jsp:
<%@ page isErrorPage="true" %>
<html>
<head>
<title>Display the Exception Message here</title>
</head>
<body>
<h2>showerror.jsp</h2>
<i>An exception has occurred in the index.jsp Page.
Please fix the errors. Below is the error message:</i>
<b><%= exception %></b>
</body>
</html>
Output:
2. Using try..catch block just like we used in core java
<html>
<head>
<title>using try..catch </title>
</head>
<body>
<%
try{
int i = 111;
i = i / 0;
out.println("The answer is " + i);
}
catch (Exception e){
out.println("An exception occurred: " + e.getMessage());
}
%>
</body>
</html>
Output:
An exception occurred: java.lang.ArithmeticException:/byzero


